
Timeline
09:00 ~ 10:00 : 데일리 스크럼
10:00 ~ 11:00 : 계산기 과제 발제
11:00 ~ 12:00 : 개인 학습(1주차 복습)
12:00 ~ 13:00 : 점심 시간
13:00 ~ 14:00 : 개인 학습
14:00 ~ 15:00 : 프로그래밍 기초
15:00 ~ 18:00 : 개인 학습
18:00 ~ 19:00 : 저녁 시간
19:00 ~ 21:00 : 개인 학습 및 TIL 작성
2주차
어제 2-5까지 봤는데 오늘 1주차 다시 복습하고 2주차 다시 진행
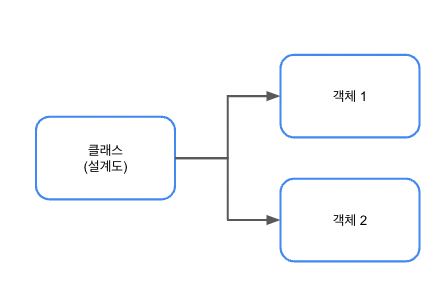
클래스란 객체를 만들때 필요한 설계도
클래스 첫글자는 대문자여야 함
객체란 실제로 존재하는 것
객체를 만드는 것을 인스턴스화라고 한다.
생성자(constructor) : 객체 생성 정의 한다.
생성자가 없으면 클래스를 객체화 불가하나, 기본적으로 클래스 생성시 기본 생성자가 눈에 안보이지만 존재함.
예제 : Main, Person
package chapter2;

public class Main {
    public static void main(String[] args) {
        Person personA = new Person("sun",20);
        Person personB = new Person("steve",15);

//        System.out.println("before personA name "+personA.name);
//        System.out.println("before personB name "+personB.name);
//        personA.name = "sun";
//        personB.name = "steve";
//        System.out.println("after personA name "+personA.name);
//        System.out.println("after personB name "+personB.name);

        // 기능 활용
        int result1 = personA.sum(1,2);
        int result2 = personB.sum(2,4);
        System.out.println("result1 = " + result1);
        System.out.println("result2 = " + result2);

        // getter 활용
        String name = personB.getName();
        System.out.println("name = " + name);

        // setter 활용
        System.out.println("personA's address = " + personA.address);
        personA.setAddress("Seoul");
        System.out.println("personA's address = " + personA.address);

    }
}
package chapter2;
public class Person {
// 1. 속성 - 변수 선언으로 표현할 수 있습니다.
String name;
int age;
String address;
// 2. 생성자
// 생성자 특징 :
// 1. 클래스 이름과 동일하다.
// 2. 반환 타입이 존재하지 않습니다.
// 3. 여러 개가 존재할 수 있습니다.
Person(String name, int age){
this.name = name;
this.age = age;
//this : 생성된 객체 자신
}
// 3. 기능(메서드 부분)
int sum(int value1, int value2) {
int result = value1 + value2;
return result;
}
//getter - 속성을 가져오는 기능
String getName(){
return this.name;
}
//Setter - 속성을 외부에서 설정할 수 있게 하는 기능
void setAddress(String address){
this.address = address;
}
}result1 = 3
result2 = 6
name = steve
personA's address = null
personA's address = Seoul14:00 ~ 15:00 : 자바 프로그래밍 기초
1. JVM : 자바 이론
2. 변수 : 데이터 저장공간
3. 함수 : 작업 단위를 표현하는 방법
4. 문법 : 자바 코드의 기본 구성 요소
5. 컨벤션 : 자바 코드의 형태
1. JVM (Java Virtual Machine)
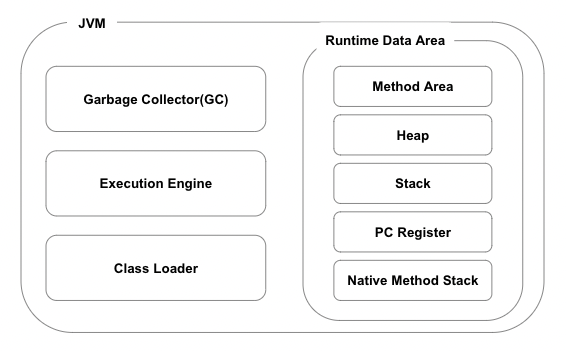
자바는 JVM을 설치를 하고 그 위에서 동작을 함.
자바를 사용하는 목적 : One Write Use Anywhere
알고리즘을 짰는데 느린 것 같다. 그럴 때 JVM 구조를 공부하면 됨.
2. 변수 : 데이터 저장 공간
3. 함수 : 작업 단위를 표현하는 방법
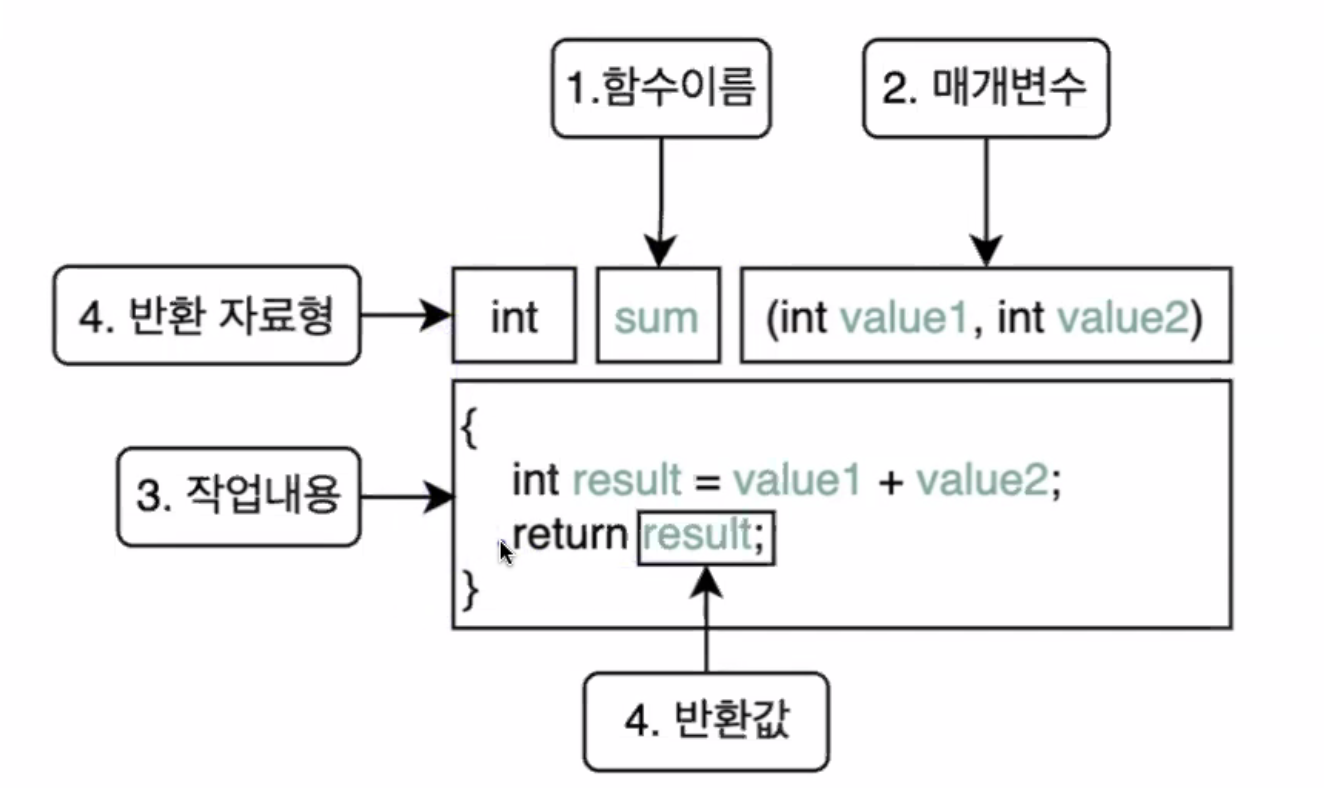
특정 작업을 수행하는 코드의 묶음
함수이름 : 함수가 하는 일을 짐작하기 쉽게 네이밍한다.
매개변수 : 함수가 작업을 수행할 때 필요한 데이터가 있다면 변수 단위로 명시
작업내용 : 함수가 작업할 내용을 중괄호 {} 안에 명령문으로 나열
반환값 : 함수가 작업한 결과 ㄱ밧을 반환해야 할 때 사용(선택사항)
4. 문법
조건문, 반복문
5. 네이밍 컨벤션
- 패키지 이름은 소문자로 구성, 언더스코어(_)나 대문자를 섞지 않는다.
- 클래스 이름 : 명사나 명사절, 파스칼 케이스(대문자 카멜 케이스)
- public class Reservation
- public class AccessToken
- 인터페이스 이름 : 명사/형용사, 파스칼 케이스(대문자 카멜 케이스)
- public interface
- 메서드 이름 : 동사/전치사, 카멜 케이스
- toString(), renderHtml()
- 변수 이름 : 카멜 케이스
- private int accessToken;
- 상수 이름 : 스크리밍 스네이크 케이스
- public final String POSTAL_CODE_EXPRESSION;
- 주의사항
- 임시 변수 외 1글자 이름 사용 금지
- 나쁜 예 : HtmlParser p = new HtmlParser();
- 좋은 예 : HtmlParser htmlParser = new HtmlParser();
- 한 줄에 한 문장
- 나쁜 예 : int a = 2; int b = 3;
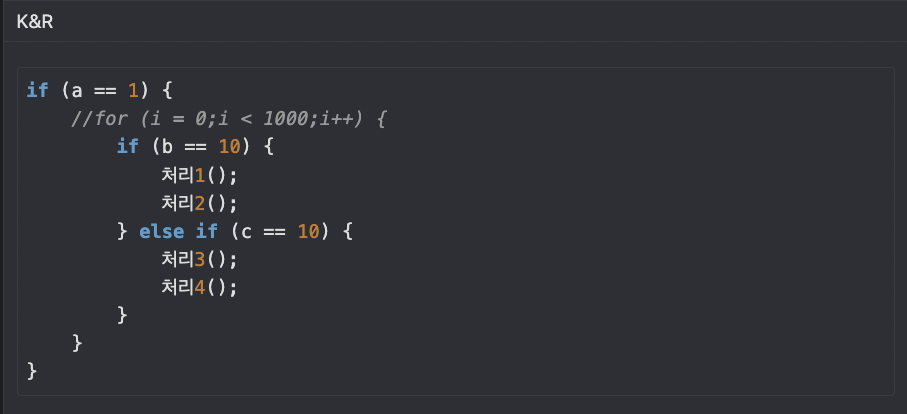
- 코드 블록 K&R 스타일 선호한다.
- 조건/반복문에 중괄호 필수 사용
- 나쁜 예 : if (exp == null) return false;
- for(char ch : exp.toCharArray()) if (ch==0)
- 임시 변수 외 1글자 이름 사용 금지
JVM 메모리 영역


자바 코드 실행 시각화 도구
https://cscircles.cemc.uwaterloo.ca/java_visualize/
Java Visualizer
Write your Java code here: args: +command-line argument stdin (also visualizes consumption of StdIn) x <!-- Execute code using Python 2.7 Python 3.3 , --> <!-- these two make sense, but are not implemented yet hide frames of exited functions show frames of
cscircles.cemc.uwaterloo.ca

Stack 영역 : Frames
Heap 영역 : Objects
노란색 : 다음 실행 라인
객체는 Heap 영역에 생성


테스트 코드
public class Main {
    static class Person {

        // 1. 속성
        String name;
        int age;
        String address;

        // 2. 생성자
        Person(String name, int age) {
            this.name = name;
            this.age = age;
        }

        // 3-1. 소개 기능(이름 나이 출력 기능)
        void introduce() {
            System.out.println("나의 이름은");
            System.out.println(this.name + "입니다.");
            System.out.println("나의 나이는");
            System.out.println(this.age + "입니다.");
        }

        // 3-2. 더하기 기능(소개를 하고 더하기 연산 수행)
        int sum(int value1, int value2) {
            introduce();
            int result = value1 + value2;
            return result;
        }
    }

    public static void main(String[] args) {
        String name = "Steve";
        int age = 20;
        Person personA = new Person(name, age);
        personA.introduce();

        int value1 = 1;
        int value2 = 2;

        int ret = personA.sum(value1, value2);
        System.out.println(ret);
    }
}
래퍼클래스(Wrapper Class)란
기본 자료형을 객체로 감싸는 클래스
> 기본형 데이터를 객체처럼 다뤄야 할 때 사용
| 기본 자료형 | 래퍼 클래스 |
| int | Integer |
| double | Double |
| char | Character |
| boolean | Boolean |
| float | Float |
| long | Long |
| short | Short |
| byte | Byte |
참조형 (Reference Type) 변수
참조형 변수는 데이터가 저장된 메모리 주소를 반환한다.
package chapter2.wrapper;

public class Main {
    public static void main(String[] args) {
        // 기본형 변수
        int a = 1;
        System.out.println("a = " + a);

        // 참조형 변수
        Person personA = new Person();
        System.out.println("personA = " + personA); // 메모리의 주소값이 출력 됨

        // 래퍼클래스
        // 참조형변수입니다.
        Integer num = 100;
        // 래퍼 클래스는 메모리 주소값이 아니라 바로 값이 나옴
        // 래퍼클래스 내부적으로 처리가 되어있기 때문에
        System.out.println("num = " + num);
    }
}
package chapter2.wrapper;
public class Person {
}a = 1
personA = chapter2.wrapper.Person@1f32e575
num = 100기본형 연산과 래퍼형 연산의 재밌는 성능 차이
- 래퍼형은 내부적으로 데이터를 감싸고 있기때문에 연산시 불리합니다.
- 객체에서 기본형 값을 꺼내서 연산하는 추가작업이 발생하기 때문입니다.
- 이런 추가 작업때문에 기본형보다 래퍼클래스는 연산 속도가 느립니다.
- 빠른 작업이 필요한 경우 기본형을 직접 활용하는 것이 좋은 선택입니다.
public class PrimitiveVsWrapperPerformance {
    public static void main(String[] args) {
        int iteration = 10_000_000; // 1000만 번 반복

        // 기본형 int 연산 성능 테스트
        long startTime1 = System.nanoTime();
        int sum1 = 0;
        for (int i = 0; i < iteration; i++) {
            sum1 += i;  // 기본형 연산
        }
        long endTime1 = System.nanoTime();
        long primitiveTime = endTime1 - startTime1;

        // 래퍼 클래스 Integer 연산 성능 테스트
        long startTime2 = System.nanoTime();
        Integer sum2 = 0;
        for (int i = 0; i < iteration; i++) {
            sum2 += i;  // 오토박싱 & 언박싱 발생
        }
        long endTime2 = System.nanoTime();
        long wrapperTime = endTime2 - startTime2;

        // 결과 출력
        System.out.println("기본형(int) 연산 시간: " + primitiveTime + " ns");
        System.out.println("래퍼 클래스(Integer) 연산 시간: " + wrapperTime + " ns");
        System.out.println("성능 차이 (배수): " + (double) wrapperTime / primitiveTime);
    }
}
기본형(int) 연산 시간: 4309792 ns
래퍼 클래스(Integer) 연산 시간: 26756416 ns
성능 차이 (배수): 6.208284761770406
Static 키워드
- 모든 객체가 함께 사용하는 변수나 메서드를 만들 때
- 객체(인스턴스화)를 만들지 않아도 클래스 이름만으로 바로 사용할 수 있음.
- 모든 객체가 같은 값을 공유 합니다.
- static 변수와 메서드는 한 번만 생성되고 Method Area(메서드 영역)에 저장 됨
인스턴스 멤버
- 객체를 만들때 마다 생성되는 변수와 메서드 입니다.
- 객체(인스턴스)를 생성한 후에만 사용할 수 있습니다.
- 각 객체가 개별적으로 값을 가집니다. (공유되지 않음)
- 인스턴스는 Heap 영역에 위치합니다.
클래스 멤버(클래스 변수 + 클래스 메서드) = Static
- 클래스 자체에 속하는 변수와 메서드를 의미합니다.
- static 키워드를 사용해서 선언합니다.
- 해당 클래스로 만들어진 객체가 공유해서 사용할 수 있습니다.
- 클래스가 로드될때 Method Area 에 적재됩니다.
- 객체 생성 없이 사용 가능합니다.
Static 주의사항
- static 은 공유가 필요한 곳에 사용해야합니다.
- static 변수와 메모리는 프로그램이 종료될 때까지 메모리에 유지됩니다.
- 너무 많은 static 남용하면 메모리 낭비로 이어집니다.
- static 메서드에서는 인스턴스변수에 접근할 수 없습니다.
- ✔ “객체를 생성한 후, static 메서드에서도 인스턴스 변수에 접근 가능!”
- ✔ 단, static 메서드 내에서 직접 접근은 불가능하고, 반드시 객체를 통해 접근.
public class TestClass {
    int instanceVariable = 10;  // 인스턴스 변수

    public static void staticMethod() {
        TestClass obj = new TestClass(); // ✅ 객체 생성
        System.out.println(obj.instanceVariable); // ✅ 객체를 통해 인스턴스 변수 접근
    }

    public static void main(String[] args) {
        staticMethod();
    }
}
public class TestClass {
int instanceVariable = 20; // 인스턴스 변수
public static void staticMethod(TestClass obj) {
System.out.println(obj.instanceVariable); // ✅ 객체를 통해 인스턴스 변수 접근
}
public static void main(String[] args) {
TestClass obj = new TestClass(); // ✅ 객체 생성
staticMethod(obj); // ✅ 생성된 객체를 매개변수로 전달
}
}
final 키워드
상수를 의미, 값을 변경할 수 없음
클래스는 상속할 수 없게 만듦
메서드는 수정할 수 없게 만듦(오버라이딩 불가)
final class Animal {
    void sound() {
        System.out.println("Animal sound!");
    }
}

// class Dog extends Animal {} // ❌ 오류! final 클래스는 상속할 수 없음
class Parent {
final void show() {
System.out.println("Hello from Parent");
}
}
class Child extends Parent {
@Override
void show() { // ❌ 오류! final 메서드를 재정의할 수 없음
System.out.println("Hello from Child");
}
}
상수(Constant)
대문자로 표현하는 것이 관례
변하지 않고 일정한 값을 의미하기 때문에 static final 키워드를 사용해 선언 한다.
static으로 선언된 변수는 프로그램 시작시 한 번만 초기화되고 모든 인스턴스에서 같은 값을 공유
* 변경되지 않은 값을 static으로 선언하지 않을 경우, 똑같은 값을 여러 객체가 갖게되어 불필요한 데이터 공간 이용이 발생한다. 그래서 static을 포함해서 선언한다.
불편객체(Immutable Object)
- 불변객체는 내부 상태를 변경할 수 없는 객체입니다.
- final 을 속성(property, field) 에 활용합니다.
- 세터(setter) 없이 설계 합니다.
- 변경이 필요할 경우 새로운 객체를 만들어야 합니다.
- 예) String , Integer , 래퍼클래스 등 대표적인 불편객체
package chapter2.finalexample;

public class Main {
    public static void main(String[] args) {

        // final 활용법
        final int a = 1;
        // a = 2;
        System.out.println("a = " + a);

        // 상수 활용
        System.out.println("상수 활용 " + Circle.PI);

        //불편 객체 활용
        final Circle c1 = new Circle(2);
        //c1 = new Circle(5);
        c1.radius = 5;
        System.out.println("c1 = " + c1); //c1의 주소값 반환

        // 불변 객체의 변경이 필요한 경우
        Circle c2 = new Circle(10); //1. 새로 생성한다.
        Circle c3 = c2.changeRadius(20); // 2. 기능으로 새로운 객체 생성하여 할당
    }
}
package chapter2.finalexample;
public class Circle {
// 속성
final static double PI = 3.14159;
double radius;
Circle(double radius){
this.radius = radius;
}
Circle changeRadius(double newRadius){
return new Circle(newRadius);
}
}
인터페이스(interface)란?
- 인터페이스는 설계 표준입니다.
- 클래스가 따라야할 최소한의 공통 규칙을 정의하는 역할
- 세부 구현은 각 클래스에서 진행
- 일관성을 유지하면서 클래스가 고유한 특색을 확장할 수 있도록 돕습니다.

interface Car {
    void drive();
    void stop();
}
class LuxuryCar implements Car {
@Override
void drive() { // ✅ 인터페이스 규칙 준수
System.out.println("멋지게 이동합니다."); // 구현 내용은 자유롭습니다.
}
@Override
void stop() { // ✅ 인터페이스 규칙 준수
System.out.println("멋지게 정지합니다."); // 구현 내용은 자유롭습니다.
}
void charge() { // 🎉 CarA 만의 기능을 확장 가능합니다.
System.out.println("차량을 충전합니다");
}
}class SpeedCar implements Car {
@Override
void drive() { // ✅ 인터페이스 규칙 준수
System.out.println("빠르게 이동합니다."); // 구현 내용은 자유롭습니다.
}
@Override
void stop() { // ✅ 인터페이스 규칙 준수
System.out.println("빠르게 정지합니다."); // 구현 내용은 자유롭습니다.
}
void autoParking() { // 🎉 CarB 만의 기능을 확장 가능합니다.
System.out.println("자동 주차 기능을 실행합니다.");
}
}public class Main {
public static void main(String[] args) {
LuxuryCar car1 = new LuxuryCar();
SpeedCar car2 = new SpeedCar();
// ✅ 각 차량의 공통 기능
car1.drive();
car1.stop();
car2.drive();
car2.stop();
// ✅각 차량의 고유 기능
car1.charge();
car2.autoParking();
}
}
오류 예시 : 인터페이스 상속받은 클래스에서 인터페이스 내부 설정이 클래스에 정의되지 않았을 때


인터페이스 다중구현(multi-implementation)

// 🚀 "동물의 기본 기능" 인터페이스
interface Animal {
    void eat();
}

// ✈ "나는 기능" 인터페이스
interface Flyable {
    void fly();
}

// ✅ 다중 구현
class Bird implements Animal, Flyable {
    public void eat() {
        System.out.println("새가 먹이를 먹습니다.");
    }

    public void fly() {
        System.out.println("새가 하늘을 납니다.");
    }

    // 추가적으로 land() 메서드도 가능하지만 필수는 아님
    public void land() {
        System.out.println("새가 착륙합니다.");
    }
}
// 실행 코드
public class Main {
public static void main(String[] args) {
Bird bird = new Bird();
bird.eat(); // "새가 먹이를 먹습니다."
bird.fly(); // "새가 하늘을 납니다."
bird.land(); // "새가 착륙합니다."
}
}
인터페이스 다중상속(multi-inheritance)

// 1. 기본 인터페이스: 동물의 기본 기능
interface Animal {
    void eat();
}

// 2. 추가 인터페이스: 나는 기능
interface Flyable {
    void fly();
}

// 3. ✅ 다중 상속새로운 인터페이스: 동물 + 나는 기능
interface FlyableAnimal extends Animal, Flyable {
    void land();  // 추가 기능
}

// 4. 새 클래스 (FlyableAnimal을 구현)
class Bird implements FlyableAnimal {

    public void eat() {
        System.out.println("새가 먹이를 먹습니다.");
    }

    public void fly() {
        System.out.println("새가 하늘을 납니다.");
    }

    public void land() {
        System.out.println("새가 착륙합니다.");
    }
}
// 5. 실행 코드
public class Main {
public static void main(String[] args) {
Bird bird = new Bird();
bird.eat(); // "새가 먹이를 먹습니다."
bird.fly(); // "새가 하늘을 납니다."
bird.land(); // "새가 착륙합니다."
}
}
인터페이스에 변수를 선언하는경우
변수 선언시 형식에 관계 없이 자동으로 상수로 선언됩니다.
- public static final 로 선언됩니다.
- static 으로 선언되기 때문에 구현체 없이도 활용 가능합니다.
- 인터페이스는 표준의 역할이므로 변수선언은 최소화하는 것이 좋습니다.
public interface Config {
    int POPULATION = 100; // public static final 로 선언됩니다.
}
public class Main {
public static void main(String[] args) {
System.out.println(Config.POPULATION);
}
}
객체지향의 4가지 특징 PART 1
캡슐화(Encapsulation)란?
- 객체의 정보를 외부에서 직접 접근하지 못하게 보호하는 개념입니다.
- 캡슐처럼 감싸서 내부를 보호하고 외부로부터 내용물을 숨기고 있는 모습에서 유래됐습니다.
- 클래스 혹은 객체의 캡슐화는 접근제어자 를 통해서 구현할 수 있습니다.
접근제어자(Access Modifier)


데이터 접근 - Getter, Setter
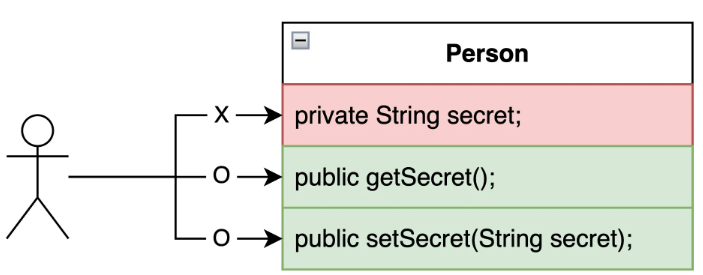
캡슐화가 된 데이터에 접근 방법
- 캡슐화가 잘 적용된 클래스는 내부 데이터를 private 으로 보호하고 있습니다.
- 데이터 조회나 변경이 필요한 경우 안전한 접근방법이 필요합니다.
- 그 역할을 수행하는 메서드가 바로 게터(Getter)와 세터(Setter) 입니다.
public class Person {
    private String secret;

    public String getSecret() {
    	return this.secret; // ✅ 객체의 secret 속성 반환
    }
}
public class Main {
public static void main(String[] args) {
Person p1 = new Person();
p1.secret; // ❌ 직접 접근 불가능
String newSecret = p1.getSecret(); // ✅ 게터를 활용해 접근가능
}
}public class Person {
private String secret;
public void setSecret(String secret) {
this.secret = secret; // ✅ secret 속성 설정 및 변경
}
}public class Main {
public static void main(String[] args) {
Person p1 = new Person();
p1.secret = "password"; // ❌ 직접접근, 변경 불가능
p1.setSecret("newPassword"); // ✅ 세터를 활용해 접근, 변경가능
}
}
무분별한 Setter 예시
시나리오1: 핵시설을 관리하는 개발자
package chapter2.capsulation.v1;

// 핵시설 관리하는 개발자
public class DataStore {
    // "B" 문자열이 들어오면 핵폭발 발생
    private String store;

    // 무분별한 setter 예시
//    public void setStore(String store){
//        this.store = store;
//    }

    public void setStore(String store){
        if(store.equals("B")){
            System.out.println("B가 입력되면 안됩니다.");
        }else{
            this.store = store;
        }
    }
}
package chapter2.capsulation.v1;
import javax.xml.crypto.Data;
public class Main {
public static void main(String[] args) {
DataStore dataStore = new DataStore();
// dataStore.store = "A";
dataStore.setStore("B");
}
}
객체지향의 4가지 특징 PART 2
상속(Inheritance) 이란?
- 클래스간의 관계를 부모(상위), 자식(하위) 로 바라보는 개념입니다.
- 이 구조를 통해 상속에서는 재사용성, 확장 이 가능합니다.(중요한 키워드 입니다.)
- → 물려받은 속성과 기능은 자식 클래스에서 재사용할 수도 있고, 확장할수도 있습니다.
- extends 키워드를 사용해서 상속관계를 구현합니다.
- 부모의 속성과 기능을 자식이 자연스럽게 물려받는다라고 생각하면 이해하기 쉽습니다.
- 상속을 통해 코드 중복을 줄이고 유지보수성을 높일 수 있습니다.
- 추상화, 다형성을 구현하는데 잘 활용됩니다.
상속의 첫 번째 장점 - 재사용성을 살펴봅시다.
- 상속의 장점은 **부모 클래스의 내용을 물려받아 그대로 재사용**할 수 있습니다.
package chapter2.interitance;

public class Parent {
    public String familyName = "park";
    public int honor = 10;

    public void introduceFamily(){
        System.out.println("가문의 이름 : " + familyName);
    }
}
package chapter2.interitance;
public class Child extends Parent{
}package chapter2.interitance;
public class Main {
public static void main(String[] args) {
Child c1 = new Child();
System.out.println(c1.familyName);
System.out.println(c1.honor);
c1.introduceFamily();
}
}park
10
가문의 이름 : park
super - 부모 인스턴스
super 는 부모클래스의 멤버(변수, 메서드)에 접근할 때 사용하는 키워드
public class Child extends Parent {

    private String familyName = "gim"

    public void superExample() {
        System.out.println("우리 " + this.familyName + " 가문은 ...");
        System.out.println("원래 가문의 이름은 " + super.familyName);
    }
}
super() - 부모 인스턴스의 생성자
- 부모가 먼저 생성되고 자식이 생성됩니다.
- 부모가 먼저 생성되어야 하므로 super()는 항상 생성자의 첫 줄에 위치해야 합니다.
public class Child extends Parent {

		...

    public Child() {
        super(); // ✅ (1)부모클래스 생성자를 먼저 호출
        // 추가로직은 여기에 작성
    }
}
public class Parent {
public Parent() {} // ✅ 부모 생성자
}
상속의 두 번째 장점 - 확장
- 부모클래스의 기능을 유지하면서 자식클래스에서 기능을 확장할 수 있습니다.
- 자식클래스에서 새로운 메서드를 추가하면 됩니다.
재정의 - 메서드 오버라이딩(overriding)
- 부모 메서드를 자식 클래스에서 변경하여 재정의하는 것을 의미합니다.
- 오버라이드된 메서드에는 @Override 키워드를 붙이는 것을 권장합니다.(없어도 동작합니다.)
- @Override 를 붙이면 컴파일러가 부모 클래스에 동일한 메서드가 없다고 경고를 줘서 실수를 방지할 수 있습니다.
- 메서드 이름, 매개변수, 반환타입이 완전히 동일해야합니다.
- 접근 제어자는 부모보다 더 강한 수준으로만 변경 가능합니다.
public class Parent {

    // 기존 기능
    public void introduceFamily() {
        System.out.println("우리 " + familyName + " 가문은 대대로 명성을 이어온 가문입니다.");
    }
}
class Child extends Parent {
...
@Override
void introduceFamily() { // ✅ 자식클래스에서 재정의
System.out.println("오버라이드");
}
}public class Main {
public static void main(String[] args) {
Child child = new Child();
child.introduceFamily(); // 출력 "오버라이드"
}
}
추상클래스 abstract
공통 기능을 제공하면서 하위 클래스에 특정 메서드 구현을 강제하기 위해 사용됩니다.
- 객체를 생성할 목적이 아니라 “설계도” 역할을 할때 적합합니다.
- abstract 키워드로 클래스를 선언하면 추상클래스입니다.
- abstract 키워드로 메서드를 선언하면 자식클래스에서 강제로 구현해야합니다.
- 추상클래스로 객체를 생성할 수 없습니다.
- 일반 클래스처럼 변수와 메서드를 가질 수 있습니다.
abstract class Animal {

    private String name; // ✅ 변수선언가능

    abstract void eat(); // ⚠️ 추상메서드: 상속 받은 자식은 강제 구현해야합니다.

    public void sleep() { // ✅ 자식클래스에서 재사용가능합니다.
        System.out.println("쿨쿨");
    }
}
public class Cat extends Animal {
@Override
void eat() {
System.out.println("냠냠"); // ⚠️ 자식클래스에서 강제 구현해야합니다.
}
}public class Main {
public static void main(String[] args) {
Animal animal = new Animal(); // ❌ 추상클래스는 구현할 수 없습니다.
Cat cat = new Cat();
cat.eat(); // ⚠️ 강제 구현한 메서드 사용
cat.sleep(); // ✅ 부모클래스의 매서드 사용
}
}추상클래스와 인터페이스 차이점
- 상속이 계층적 구조를 선언하기 적합합니다.
- 인터페이스는 표준을 제공하는 데 적합합니다.
- 인터페이스는 인스턴스 변수를 선언할 수 없습니다.
- 계층적 구조를 표현하면서 공통 속성과 기능을 재사용할 때 추상클래스를 사용하는것이 적합합니다.

객체지향 4가지 특징 PART 3
추상화
추상화란 불필요한 정보를 제거하고 본질적인 특징만 남기는 것을 의미
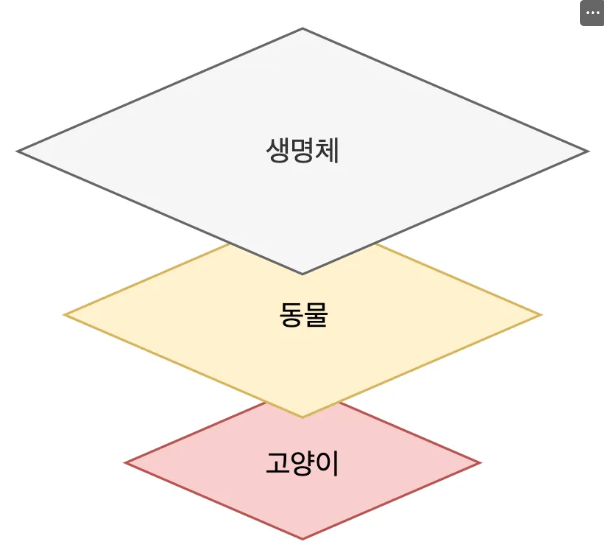
인터페이스 상속을 활용한 추상 계층 표현
public interface LifeForm {
    void exist(); // ✅ 공통: 모든 생명체는 존재한다.
}
public interface Animal extends LifeForm {
void makeSound(); //✅ 공통: 모든 동물은 소리를 냅니다.
}public class Cat implements Animal {
@Override
public void exist() {
System.out.println("고양이가 존재합니다.");
}
@Override
public void makeSound() {
System.out.println("야옹");
}
public void scratch() {
System.out.println("스크래치");
}
}
클래스 상속을 활용한 추상 계층 표현
public class LifeForm {

    public void exist() {
        System.out.println("존재합니다2"); // ✅ 공통: 모든 객체는 존재한다.
    }
}
public class Animal extends LifeForm {
public void makeSound() {
System.out.println("소리를 냅니다2"); // ✅ 공통: 모든 생명체는 성장한다.
}
}public class Cat extends Animal {
@Override
public void makeSound() {
System.out.println("야옹2");
}
public void scratch() {
System.out.println("스크래치!");
}
}public class Main {
public static void main(String[] args) {
Cat cat = new Cat();
cat.exist();
cat.makeSound();
cat.scratch();
}
}
객체지향 4가지 특징 PART 4
다형성(Polymorphism)이란

- 다형성은 하나의 타입으로 여러 객체를 다룰 수 있는 객체지향의 4번째 특징입니다.
- 인터페이스 상속, 클래스 상속을 활용해서 추상계층을 표현해 왔습니다.
- 이제 추상 계층이라는 특징을 활용해서 다형성을 구현할 수 있습니다.
인터페이스를 활용한 다형성

package chapter2.polymorphism.v1;

public interface LifeForm {
    void exist();
}
package chapter2.polymorphism.v1;
public interface Animal extends LifeForm{
void makeSound();
}package chapter2.polymorphism.v1;
public class Cat implements Animal{
@Override
public void makeSound() {
System.out.println("야옹");
}
@Override
public void exist() {
System.out.println("고양이");
}
public void scratch(){
System.out.println("스크래치");
}
}package chapter2.polymorphism.v1;
public class Dog implements Animal{
@Override
public void makeSound() {
System.out.println("멍멍");
}
@Override
public void exist() {
System.out.println("강아지");
}
public void wag(){
System.out.println("흔들흔들");
}
}package chapter2.polymorphism.v1;
public class Main {
public static void main(String[] args) {
//다형성 활용
Animal animal1 = new Cat();
Animal animal2 = new Dog();
animal1.exist();
animal1.makeSound();
animal2.exist();
animal2.makeSound();
Cat cat = (Cat)animal1;
cat.scratch();
Dog dog = (Dog)animal2;
dog.wag();
//Cat cat2 = (Cat) animal2; // animal2 = Dog; -> 에러 발생
//다운캐스팅 instanceof 활용 방법
if (animal2 instanceof Cat){ //animal2가 Cat과 같은 자료형태라면
Cat cat2 = (Cat)animal2;
cat2.scratch();
}else{
System.out.println("고양이가 아닙니다.");
}
// 다형성을 사용하는 예시
Animal[] animals = {new Cat(), new Dog(), new Cat()};
for(Animal animal : animals){
animal.makeSound();
}
}
}고양이
야옹
강아지
멍멍
스크래치
흔들흔들
고양이가 아닙니다.
야옹
멍멍
야옹
형변환(Casting)
형변환이 다형성에서 중요한 이유를 알아봅시다.
- 부모타입으로 자식타입을 다룰 수 있는 이유는 자동으로 형변환(Casting) 이 발생했기 때문입니다.
- 자식타입 → 부모타입: 업캐스팅(UpCasting)
- 부모타입 → 자식타입: 다운캐스팅(DownCasting)
업캐스팅(UpCasting) - 자식 → 부모
public class Main {

    public static void main(String[] args) {

        // 다형성 활용
        Animal animal = new Cat(); // ✅ 자동 형 변환
        animal.exist();
        animal.makeSound();
        animal.scratch(); // ❌ 사용 불가
    }
}
업캐스팅은 부모의 타입으로 데이터를 다룰 수 있지만 자식 클래스의 고유기능을 활용할 수 없습니다.
- 자식 클래스의 고유 기능을 사용하려면 다운캐스팅 이 필요합니다.
다운캐스팅(DownCasting): 부모 → 자식
public class Main {

    public static void main(String[] args) {

        // 다형성 활용
        Animal animal = new Cat();
        animal.exist();
        animal.makeSound();
        Cat cat = (Cat) animal; // ✅ 다운캐스팅(부모Animal -> 자식Cat)
        cat.scratch(); // ✅ 자식 클래스의 기능 활용 가능
    }
}
다운캐스팅(DownCasting)의 주의사항
잘못된 다운캐스팅은 컴파일단계에서 감지할 수 없습니다.
- 컴파일러는 다운캐스팅이 문법적으로 올바른지 여부만 검사해주기 때문에
- 런타임시에 실제 어떤 객체가 변수에 할당되는지 검사해 주지 않습니다.
- 컴파일 시점에는 오류 없이 통과되지만 런타임시점에 ClassCastException 이 발생할 가능성이 있습니다.
그래서 다운캐스팅을 사용할때 항상 instanceof 를 활용해야합니다.
- instanceof 는 객체가 특정 클래스나 인터페이스의 인스턴스인지 확인해 주는 역할을 합니다.
- 주로 다운캐스팅 하기 전에 타입을 검사해서 ClassCastException 을 예방하는데 활용됩니다
public class Main {

    public static void main(String[] args) {

        Animal animal2 = new Dog();

        // ✅ 안전한 다운캐스팅(animal2 가 Cat 의 인스턴스 유형인지 확인합니다.)
        if (animal2 instanceof Cat) {
            Cat cat = (Cat) animal2;
            cat.scratch();
        } else {
            System.out.println("객체가 고양이가 아닙니다.");
        }
    }
}
다형성의 장점
public class Main {

    public static void main(String[] args) {
        Animal[] animals = {new Cat(), new Dog()};
        for (Animal animal : animals) {
            animal.makeSound();
        }
    }
}
'코딩 > sparta TIL' 카테고리의 다른 글
| TIL 8 : Java 문법 종합반 3주차 (0) | 2025.02.26 |
|---|---|
| CH2 계산기 과제 (0) | 2025.02.25 |
| TIL 6 : Java 문법 종합반 1주차 (1) | 2025.02.24 |
| TIL 5 : KPT (0) | 2025.02.21 |
| TIL 3 : 깃 컨벤션 & JS Async (0) | 2025.02.19 |